
You are about to start timing jobs on the shop floor, and the first task is a badge for everyone. Search for employee badges and you get card printers, design templates and time clock help pages; most of them assume an office badge with a photo, a job title and a department. On a shop floor the badge has a narrower job. This article walks the person preparing the badges through the decisions in order: what goes on the card, barcode or QR code, what the badge code is built from, which size, and what to do about new hires, lost badges and people who leave.
The short answer: on a shop floor a badge is not an introduction card, it is the key that answers “who is this?” at the terminal. It carries only what does a job: the name, the personnel number, the code to scan and that code in plain text. The code is built from the personnel number, the symbol is picked to suit the scanner you own, and you decide in advance what happens with new hires, lost badges and people who leave.
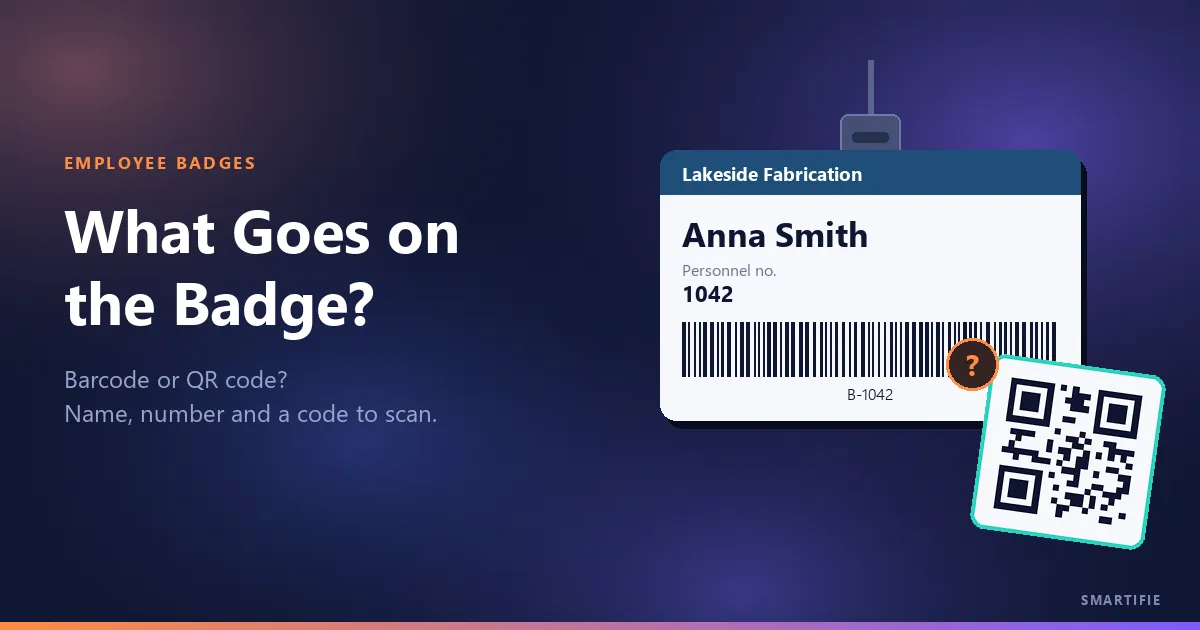
What a badge is for on the shop floor: a key to scan, not an introduction
In an office, a badge gets you through a door and tells people who you are. If you are timing jobs on the shop floor, the badge has a different main job: the operator scans it at the terminal when starting work, and the record goes to the right person. We covered why the “who” on a labor ticket should be a code rather than a typed or picked name, so we will not repeat it here. This article is about the card that carries that code.
One detail shapes how badges are prepared: you need the most of them in installation week. The terminal goes live that day, and anyone without a badge cannot start a job by scanning. So the first print run is a batch, not one at a time; after that, badges are printed one by one for new hires and lost cards. Most of the decisions below are made with those two moments in mind.
What belongs on an employee badge, and what to leave off
The test is simple: every item on the card needs a job to do. A badge is worn where anyone can see it all day; an item that does no work just sits there in public. On a shop-floor badge, these do work:
- The name, large: so it is clear from a distance whose badge it is, and badges do not get mixed up when they are handed out.
- The personnel number: it tells apart two people with the same name, and it is the number a supervisor sees on the record.
- The code to scan, with the same code in plain text underneath: so it can be typed in when the scanner fails or the card is worn.
- The company name: so a badge someone finds can be traced back to you.
National ID or Social Security numbers, phone numbers, home addresses, department, shift and skills stay off. None of them helps a scan. Identity and contact details sit on display all day; department, shift and skills change, and when someone moves to another team or shift the badge starts carrying wrong information and has to be reprinted. A badge that only carries things that do not change stays valid for years.
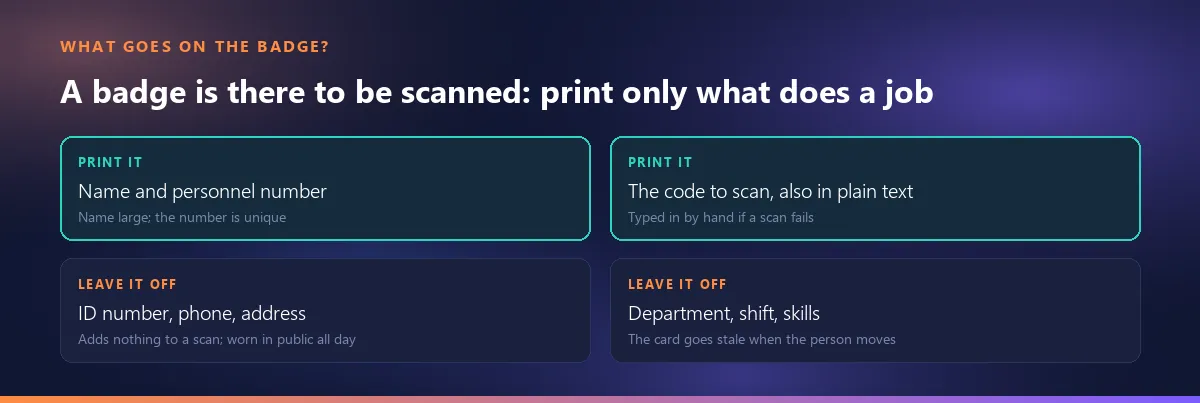
Smartifie Start Stop makes this split by default: department, shift and skills are never printed on the badge. The company logo, the operator's work center and a headline are optional; they are off in the template by default, and the first time one of them is turned on the screen asks you to confirm once. The company name sits in the colored band at the top of the card; it comes from your company settings and can be changed for a single print run in the “Company name on the card” box.
Should the badge have a photo?
The answer depends on who checks the badge. If it is scanned at a terminal, a photo adds nothing there; the terminal recognizes the person by the code. If a guard also checks badges at the gate, or there are many visitors and contractors who do not know who is who, a photo can earn its place. In that case, tell your people why the photo is wanted and keep its use to the badge.
In Smartifie Start Stop, photos are off by default. The photo layouts cannot be picked until personnel photos are turned on in Settings; until then the badge prints in the “Minimal” layout: name, code and scannable code only.
Front and back: what goes on the back of the badge?
The front is personal; the back is the same on every badge. Personal details do not move to the back; it carries short instructions for whoever wears or finds the badge: “If found, please return to the front office.”, “Do not fold the card or write over the code.” The most useful line on the back is usually the first one: it brings lost badges home.
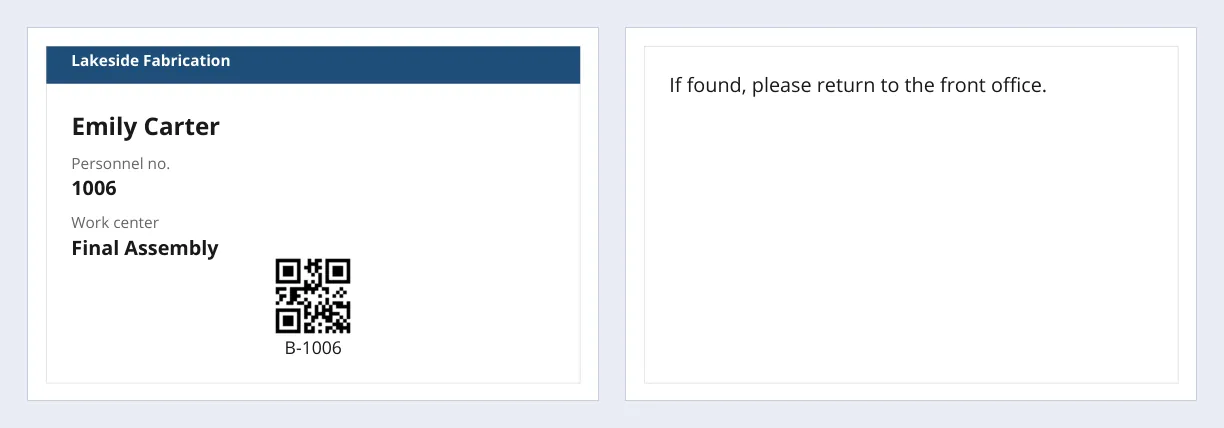
When “Print a back side” is on in Smartifie Start Stop's badge template, the text you write is printed identically on the back of every card; the note on screen says as much: instructions for whoever wears it, not personal data. For a single badge, the back is page two of the PDF; in a batch, the back pages follow the front pages.
Barcode or QR code? Let the scanner you own decide
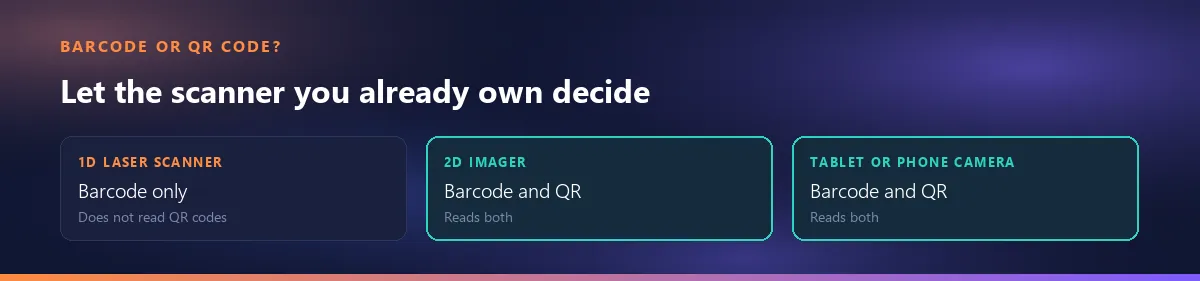
Do not ask which one is more modern; ask what will read the badge at the terminal. If the badge's only job is to be scanned, the right symbol is the one your scanner reads.
Three scanners, three answers
- 1D laser scanner: reads barcodes only, not QR codes. If this is what you have, the answer is a barcode.
- 2D imager: reads both barcodes and QR codes. The choice comes down to the card layout.
- Tablet or phone camera: reads both; this is how you start without buying a separate scanner.
The two symbols also behave differently on a card. A barcode grows with the length of the code; a long code has to get thinner to fit the width of the card and becomes harder to read, so on a barcode badge the code stays short. A QR code is a small square that sits in the middle of the card. If you already have barcode badges and your scanner reads them, do not switch to QR just for the sake of it. Changing the code type does not change the badge code itself: the same code is simply printed as a different symbol.
We will not repeat general barcode type selection, the differences between types or why a barcode does not scan; barcode types and why a barcode won't scan are covered on our free barcode generator page.
In Smartifie Start Stop's badge template, “Code type” has two options: Barcode (Code 128, the default) or QR code. The terminal's camera reads both; if you use a scanner attached to the terminal, pick the one it reads. With Barcode selected, if someone's code contains characters Code 128 cannot print, their row says “Code cannot be printed” and the badge cannot be selected; the problem shows up on screen, not on paper.
What the badge code is built from: the personnel number, not typing
Typing badge codes into a spreadsheet looks easy, but typed codes drift over time: “1042” on one card, “P-1042” on another, “ 1042” with a leading space somewhere, a colleague's number copied by mistake. The scan then finds nobody, or finds the wrong person, and the time goes on someone else's record. The fix is that nobody types the code; a rule builds it.
- Start from the personnel number. It is different for everyone and does not change while the person works for you; a code built from it is unique because the number is.
- A short prefix is fine. A prefix such as “B-1042” says the code belongs to a badge and keeps it apart from numbers on other labels.
- Keep names and work centers out of the code. Two people can share a name, and when someone changes work center the code changes, and so does the badge.
- Keep it short. When a scan fails the code gets typed by hand, and a code longer than 20 characters is hard to type correctly.
- Use only plain letters, digits and dashes. Scanners send the code as keystrokes, and an accented letter can turn into a different character depending on the keyboard layout.
An internal code like this does not need a number from GS1; we covered whether an internal code needs a GS1 number separately.
In Smartifie Start Stop, nobody types a badge code; it is built by the “Badge code generator” rule in Settings. The rule is made of pieces (personnel no., fixed characters, name, work centers, operations), and the default is the personnel number alone. If the rule has no personnel number, the screen warns that two people could get the same code; if the code runs past 20 characters, it reminds you that it will be hard to read and to type. Fixed characters can only be letters, digits and a few punctuation marks, and the name is folded to plain capital letters. On the operator card, the code the rule will build is shown before you save; if a change would alter the code, the form says so and warns that the old badge will stop scanning. One warning: if you change the rule and choose “Apply to all operators”, everyone whose code changes has a printed badge that will no longer scan, and needs a new one.
Badge size and printing: bank card or lanyard card?
Three sizes cover most needs. Bank card size (85.6 × 54 mm) fits standard badge holders and a wallet. A portrait lanyard card (60 × 90 mm) hangs straight on a lanyard. A large badge (100 × 70 mm) makes the name readable from a distance, useful where there are many visitors or new faces.
There are two ways to print: on paper with the office printer, cut out and slipped into a holder or laminated, or by handing the PDF to a card printing service. The deciding factor is how hard the badge is used. Oil, dust, gloves and frequent scanning wear paper out quickly, and in that kind of shop lamination or a printing service pays for itself. On a clean assembly line, a paper badge in a holder lasts a long time and reprinting takes minutes.
Smartifie Start Stop offers these three sizes and prepares the badges as a PDF; it does not drive a card printer directly. The one-card PDF puts the badge in the top-left corner of the page. In a batch, badges are laid out on A4 pages according to the size you chose, and a new page starts when one is full.
Installation day: the whole team at once; after that, one badge at a time
On installation day the question is not “who needs a badge?” but “everyone”. Print them in one PDF and make sure the order on the sheet matches the order on your list, so whoever hands the badges out can go down the list and tick people off. In the weeks after, the work comes one at a time: someone new starts, a badge gets lost. Then only that person's badge is printed.
For a new hire there is one step not to skip: the code has to exist first. Someone without a badge code cannot be given a badge, and cannot start a job at a terminal that identifies people by badge. On the first day you need to see who is missing a code before you print.
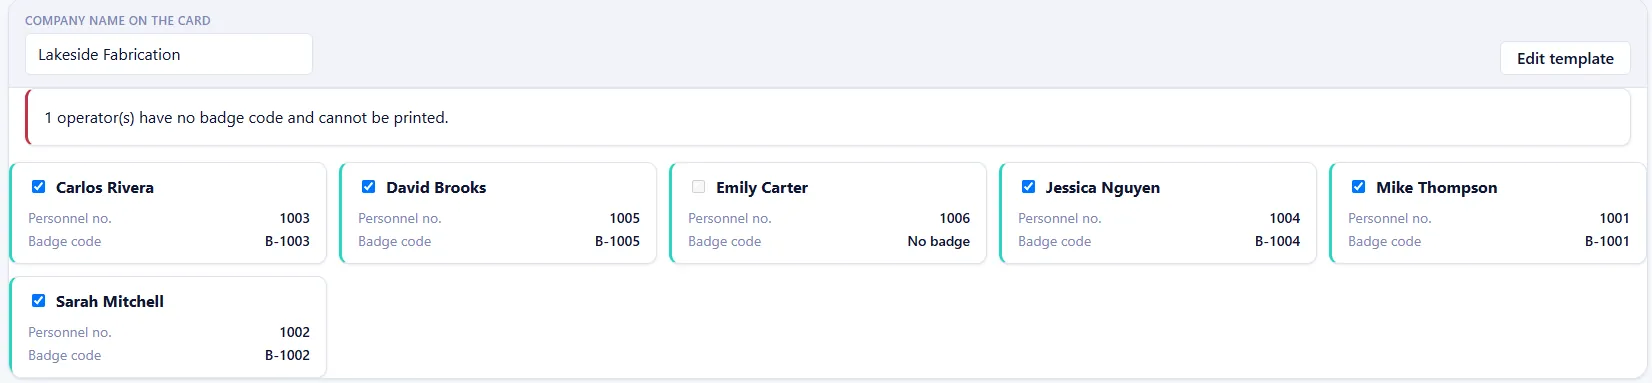
In Smartifie Start Stop, when you open “Badges” under Master data, everyone who can be printed starts out ticked. An operator without a badge code cannot be ticked, shows a red “No badge” where the code should be, and a line above the list says how many people cannot be printed. Open that person's card on the Operators screen and save it, and the code is built from the rule; back on Badges, they come up ticked. “One card” on each row makes a PDF for that person only; the button at the top, such as “Print 6 card(s)”, puts everyone selected into a single A4 PDF, in the order shown on screen. In the cloud, the PDF downloads in your browser; in the desktop app, the file is saved and the screen tells you where.
You can watch a new hire's code being built, the badge template being set up, and one badge and a whole A4 sheet being printed in a few minutes in the video below. The people, company and badge codes in it are fictional test data.
Watch how it works
Real screens, start to finish.

Print Employee Badges with Barcode or QR | Smartifie Start Stop
How to print employee badges in Smartifie Start Stop: a badge code built from the personnel number, a barcode or QR code on the card, then one card or the whole team on a single A4 PDF.
The video loads from YouTube when you press play.
The app in the video is Smartifie Start Stop, a shop-floor terminal app that prints its own badges. For a screen-by-screen walkthrough, the guide has the badges screen, step by step.
Lost badges and people who leave
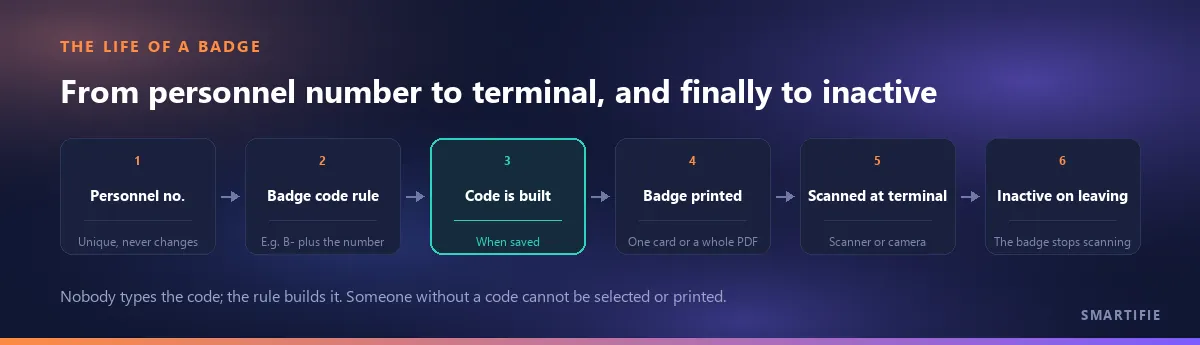
When someone leaves: do not delete them, make them inactive. Their past time records are tied to the personnel number, and deleting would leave that history without an owner. The real point of making them inactive is the badge: even if it is never handed back, the terminal will no longer start anyone on a job with it.
When a badge is lost: print a new one. If the code is built from the personnel number, the new badge carries the same code, which means the lost badge keeps scanning too. In most shops that is enough; if you do not want the badge alone to be enough, ask for a PIN as well.
In Smartifie Start Stop, making an operator inactive with “Deactivate” stops their badge from scanning at once; their records stay where they are. The “Ask for a PIN as well as the badge” setting is off by default; when it is on, the terminal asks an operator who has a PIN for it after the badge is scanned. To be straight about it: Smartifie Start Stop has no separate button that cancels one lost badge and gives the same person a new code. If the rule is the personnel number alone, a lost badge keeps scanning; if that is not acceptable, the PIN setting closes the gap.
In short: keep the badge to the name, the personnel number, the code to scan and that code in plain text; build the code from the personnel number with a rule; pick the symbol to suit your scanner; print everyone in one PDF on installation day and new hires one badge at a time after that; make leavers inactive, and decide up front whether lost badges call for a PIN.
If you want to prepare badges for your own shop, you can try Smartifie Start Stop free for 15 days, no credit card required. The trial runs in the cloud, in the browser, and badge printing is part of it.