
A cabinet order usually arrives as three numbers: width, height, depth. What goes to the saw is not those three numbers but a cut list: two sides, a bottom, stretchers, a shelf, a back, doors. In most shops that translation is done on paper or in a spreadsheet, again for every job, and whatever goes wrong there, the saw cuts faithfully. This article turns the translation into a method: how to get from the box size to the part sizes, what changes the formulas, and how to check the list before anything is cut.
The short answer: a cabinet cut list comes from the box's outside size through three decisions: which part fits between which (the joinery), how thick the sheet really is, and which dimension of each part is the length (the grain). Before you cut, add the parts back up; if they do not give you the box size, the list is wrong, and a mistake in one box repeats in every box of the job.
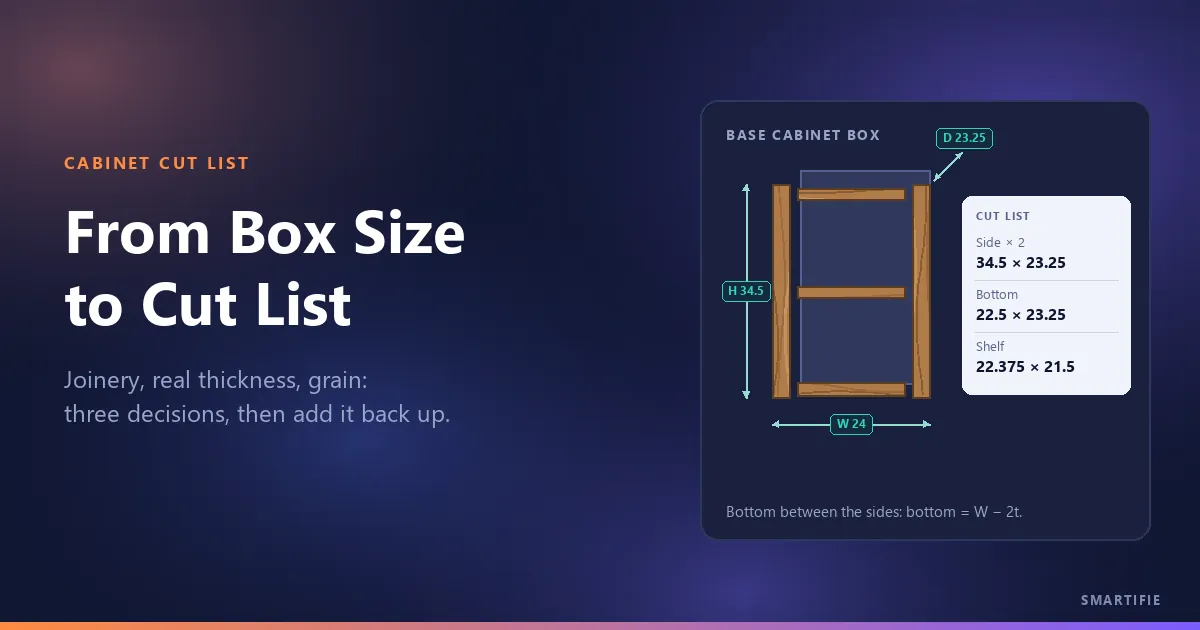
We use one example throughout: a run of three base cabinets, each box 24 × 34.5 × 23.25 in (width × height × depth), ¾ in plywood, one shelf and a pair of doors per box. The toe kick is part of the side panels, so the 34.5 in includes it. The numbers are an example, not a standard.
Where to start: outside size, inside size and “does the depth include the door?”
The box size is the outside space the cabinet takes up: W × H × D (width, height, depth). The cut list is derived from those three numbers, and the inside size is the outside size minus the panel thicknesses. In our example the inside width is 24 − 2 × ¾ = 22.5 in.
The first mix-up is in the depth: some sizes include the door, others only the box. One practitioner's guide to frameless wall cabinets gives the depth with the door, which is why his side panel width is “cabinet depth minus door thickness” (Tom Builds Stuff). In our example 23.25 in is the box alone; the door is added in front. Height raises the same question: the toe kick can be part of the side panels, or the box can sit on separate legs or a base. In our example the toe kick is in the sides: they are cut as plain 34.5 in rectangles and notched afterwards, which leaves 30 in of box above the kick.
What matters is not which convention is right but which one your job uses. If the countertop, toe kick or door is included in the size, take it off first; if not, list it as a separate part. Do not start the list until this is settled.
Joinery decides the list: which part fits between which?
The same box size can give two different cut lists; the joinery is what makes the difference. Two layouts are common:
- Full-height sides, bottom and top between them: side = H × D, bottom = (W − 2t) × D. The example in this article uses this layout.
- Full-width bottom, sides sitting on it: bottom = W × D, side = (H − t) × D.
Here t is the thickness of the case stock. The back can sit three ways, and each one changes the numbers:
- Nailed or screwed on: the back goes onto the rear of the box; it is close to the outside size, cut a little small so it does not show at the edges. If the depth was given with the back included, the sides and bottom are D minus the back's thickness deep.
- In a groove: the back slides into a groove cut in the sides and bottom; its size is the inside size plus two groove depths (less a small clearance). The sides and bottom keep their full depth.
- Inset: the back fits inside the four pieces around it. In the same practitioner's wall cabinet, the back fits inside both sides and between the top and bottom: its width is W − 2t, its height H minus the top and bottom thickness (Tom Builds Stuff).
Practitioners turn this into a pattern: every part starts from the outside size, and a fixed amount comes off it. In a forum digest, one cabinetmaker calls it a “standard deduction”: for the bottom and top stretcher he subtracts 1.5 in from the overall width, that is, ¾ in of side per side (WOODWEB 2010). A deduction is just the joinery written as a number; change the joinery and the deduction changes. The rule: write down the joinery first, then the formula.
Formulas part by part, with an example
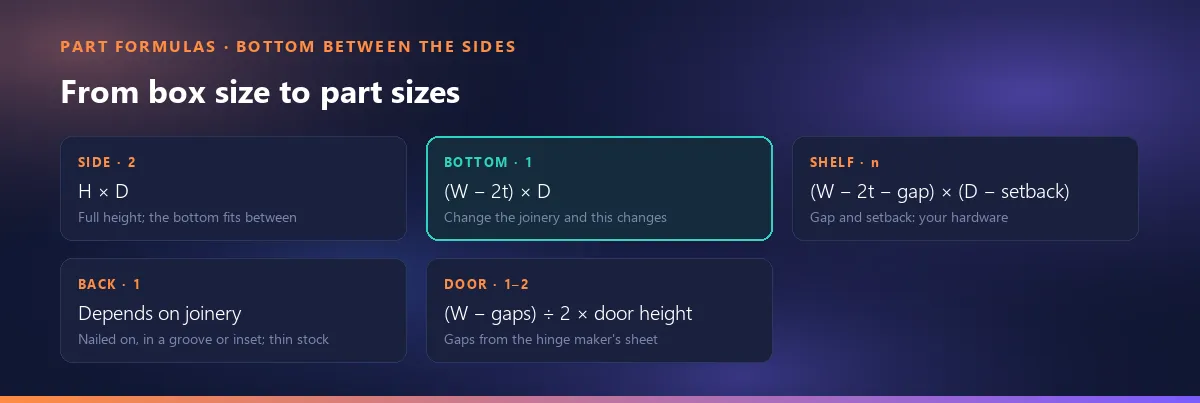
The table below is for the first layout: bottom between the sides, back in a groove. W, H, D are the outside size; t is the case thickness (¾ in in our example).
| Part | Per box | Formula | Our example (in) |
|---|---|---|---|
| Side | 2 | H × D | 34.5 × 23.25 |
| Bottom | 1 | (W − 2t) × D | 22.5 × 23.25 |
| Top stretchers (front + back) | 2 | (W − 2t) × stretcher width | 22.5 × 4 |
| Shelf | n | (W − 2t − gap) × (D − setback) | 22.375 × 21.5 |
| Back | 1 | Depends on the joinery (above); separate, thin stock | — |
| Door (pair, full overlay) | 2 | ((W − total gaps) ÷ 2) × door height | 11.875 × 30 |
The shelf gap and setback depend on your shelf pins and hinges. The same practitioner takes shelf depth as “cabinet depth minus door, minus back, minus ¼ in”, and on full-overlay doors leaves at least 1/16 in per edge, the minimum clearance with most hinges (Tom Builds Stuff). Our door figure follows that: four edges × 1/16 in = ¼ in of total gaps, so (24 − ¼) ÷ 2 = 11.875 in. In our example the door height is simply the box above the toe kick: 34.5 − 4.5 = 30 in. These are one practitioner's values; take the exact gaps from the spec sheets for your hinges and slides. Drawer boxes and slide allowances are beyond this article.
These are the same numbers that go into the cutting planner in the video at the end of this article; you can see the same list on screen there.
Measure the thickness, not the label
The t in the formula is the sheet's real thickness, not the one on the label. The practitioner behind the frameless cabinet guide puts it plainly: plywood is almost never the thickness marked on the sheet; get the actual thickness with a digital caliper and use that number in every formula (Tom Builds Stuff). The same habit pays off with MDF and melamine: measure one sheet from every new delivery.
Thicknesses also vary by market and by part. A Spanish construction price spec, for example, defines a kitchen cabinet with a 16 mm case, a 6 mm back and 19 mm doors (CYPE, in Spanish). If the case and the doors are different thicknesses, your formulas have two thicknesses in them: the case thickness sets the bottom, stretchers and shelves; the door thickness sets the side depth when the depth was given with the door.
Small differences grow. If your ¾ in sheet is really 1/32 in thin and the formula still uses 0.75, every box comes out 1/16 in narrow, and a run of three boxes ends up 3/16 in short.
A cut list holds more than sizes: which way is length, can it turn, which edges get banding?
On a cut list the order of the dimensions means something: length is the dimension that runs with the grain. The door formula gives 11.875 × 30, but the list says 30 × 11.875, because the grain runs up the door. The side is 34.5 × 23.25: its length is the height.
On a grained sheet the visible parts are locked to the grain and the hidden ones are left free; in our example the sides and doors follow the grain and the shelves are free. Which parts have to follow the grain, and how to match a supplier's dimension order, is a separate article. The point here: that decision belongs on every line of the list, not at the saw.
Edge banding is marked part by part too: which long edge, which short edge. In our example the sides, bottoms and shelves get banding on the front edge only, and the doors on all four. Whether the banding thickness comes off the cut size is a separate decision; make it once for your shop and apply it the same way on every list.
From one box to a job: multiply, merge identical parts, split by material
Once one box is listed, the job's list takes three steps. First multiply by the number of boxes: three boxes × 2 sides = 6 sides. Then merge parts that share the same size and the same marks (grain, banding) into one line; two parts of the same size with different marks stay on separate lines, like a front stretcher banded on its front edge and a back stretcher with no banding. Finally split by material: the back comes from a separate thin sheet and the base rail from a separate material; separate lines, separate cutting plans.
| Material | Part | Size | Qty | Grain | Banding |
|---|---|---|---|---|---|
| ¾ in plywood | Side | 34.5 × 23.25 | 6 | Follows | Front edge |
| Bottom | 22.5 × 23.25 | 3 | Free | Front edge | |
| Front stretcher | 22.5 × 4 | 3 | Free | Front edge | |
| Back stretcher | 22.5 × 4 | 3 | Free | — | |
| Shelf | 22.375 × 21.5 | 3 | Free | Front edge | |
| Door | 30 × 11.875 | 6 | Follows | All four | |
| Thin back stock | Back | Per joinery | 3 | — | — |
| Aluminum bar | Base rail | 72 | 2 | — | — |
Instead of working this out by hand for every job, you can keep it in a spreadsheet with formulas: put the box size and the thickness in their own cells and derive every part from them. Two tips from the same forum digest help: before you build the sheet, write out the method you use by hand and spend some time testing and adjusting it; and if anyone else will use the sheet, lock the formula cells so nobody erases them by accident (WOODWEB 2010).
To see the list laid out on a sheet, you can try it in the free cut list optimizer; working out how many sheets the list will take is covered in our article on waste percentage.
Add it back up before you cut: three checks
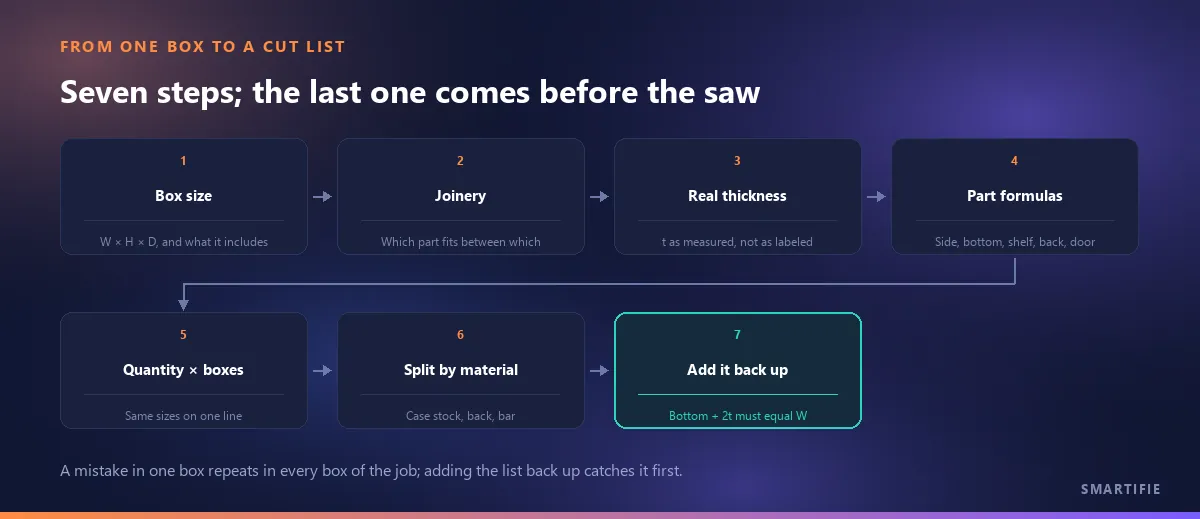
Once the list is done and before any sheet is cut, add the parts back up the other way. If they do not give you the box size, the list is wrong.
- Width: bottom + 2t = W. In our example 22.5 + 2 × ¾ = 24 in.
- Height: in the first layout, side = H; with the bottom underneath, side + bottom thickness = H. In our example 34.5 = 34.5 in.
- Depth: shelf + the depth the back takes up + the front allowance ≤ D. A 21.5 in shelf leaves 1¾ in; the back and its groove have to fit inside that.
Count the parts too: every box needs 2 sides, 1 bottom, 2 stretchers, 1 back, n shelves and 1–2 doors, and the job total is that times the number of boxes. One last check: is the length on every line really the grain direction? If the door line says 11.875 × 30, the plan will lay the door's grain sideways.
A mistake that slips through in one box repeats in every box: three times in a three-box job, ten times in a ten-box job. Adding it back up takes a few minutes; a sheet cut wrong costs more.
Getting the list into a cutting planner: typed in or pasted from Excel
Once the list is ready, it goes into a program for the cutting plan. In Smartifie Cut, a cutting planner that takes the parts list material by material, the list is entered as a “job”. Each line starts with its material, and the size boxes open to match the material's dimension: a sheet asks for length and width, a bar only for length. Rows from your spreadsheet go in with “Paste from Excel” in the order Length · Width · Qty; they take the material you choose, and a row that can't be read is not dropped quietly but listed with its line number. Visible parts get “Follow the grain”: the part's length runs along the sheet's grain and the part is never turned. Hidden parts may turn 90° when that fits better; that tick comes from the material and works together with the material's own rotation rule. Banded edges are ticked part by part as L1, L2 (the long edges) and W1, W2 (the short edges). Pasted rows come in with grain and edges empty, so you tick those after pasting. One job can hold several materials; the optimizer takes one material at a time.
One thing the program does not do, and we would rather say so: it does not work out part sizes from the box size. Cut takes every part at the size you enter; getting from the outside size to the part sizes is the method above, and it is your step. The details are in the guide's section on the job screen.
In the video below you can watch, step by step, how this article's example list goes into Smartifie Cut: the sides and shelves typed in, the bottoms and doors pasted from Excel, and the base rail in the same job. The stretchers and backs are not in the video; the sample shop has no thin back stock set up. The materials, codes and values in it are fictional example data for a sample shop.
Watch how it works
Real screens, start to finish.

Cut List Optimizer: Parts From Excel, Grain, Rotation | Smartifie Cut
How to enter a cutting job in Smartifie Cut: a cabinet parts list typed in line by line or pasted from Excel, with grain, rotation and banded edges set part by part, and an aluminum bar in the same job.
The video loads from YouTube when you press play.
A seven-point checklist before you cut:
- Box size: is it clear whether the door, toe kick and countertop are included?
- Is the joinery written down: bottom between or under the sides, back nailed on, in a groove or inset?
- Thickness: is it the measured value, and separate for the case and the doors?
- Does every part's formula match that joinery?
- On every line, is the length the grain direction, and are the banded edges marked?
- Are quantities multiplied by the number of boxes, identical parts on one line, materials split?
- Do the parts add back up to the box size?
In short: settle what the box size includes, write down the joinery, measure the real thickness, build the formulas on it, write length with the grain, and add the list back up before you cut.
If you want to turn your own cut list into a cutting plan, you can try Smartifie Cut free for 15 days, no credit card required. It runs as an app on Windows and Android, and in the browser on iPhone and Mac.