
You have the cutting diagram: one drawing per sheet, every part in place, the leftover area marked. At the saw, the first question doesn't come from the plan but from whoever is cutting: where do we start? Many diagrams carry no sequence numbers, and the numbers on the parts often identify the part, not the cut. This article shows how to read the order from the drawing itself: finding the first cut, deciding whether to rip or crosscut first, reading the marks on the plan and checking it before you cut.
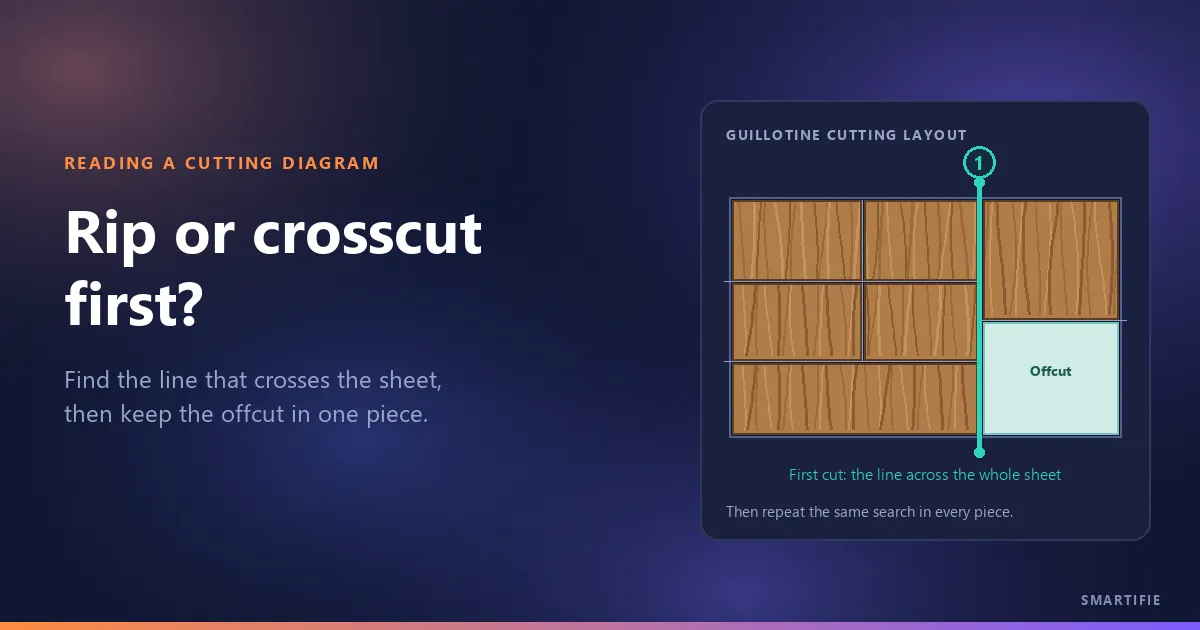
The short answer: even without sequence numbers, the first cut is written in the drawing: it is the line that runs unbroken from one edge of the sheet to the other. Then you ask the same question again for every piece that comes off. There is no single right answer to “rip or crosscut first?”; when the plan allows both, choose the order that leaves the offcut in one usable piece.
What a cutting diagram tells you, and what it doesn't
A cutting diagram is one drawing per sheet. It tells you four things: where each part sits on the sheet, its size, its orientation (straight with the grain or turned) and what is left once the parts are out. The sheet's code and size, how many sheets are cut from the same drawing and that sheet's waste figure usually sit at the top of the drawing too.
What it often doesn't tell you is the order. The number on a part usually identifies the part, meaning its line on the cut list: “1” is a side, “2” a shelf, not the first piece to cut. Some programs number the cuts and some don't. So the first job is to find the legend and learn from it what the number means. If the legend says the number is the part, you work out the order from the drawing yourself; the method below is for exactly that.
Finding the first cut: the line that runs unbroken from edge to edge
A guillotine cut splits a rectangle in two with a straight line from one edge to the opposite edge (Wikipedia). A plan meant for a panel saw is built from those cuts, and if it is, at least one line crosses the whole sheet. Look in the drawing for the straight line between the parts that enters at one edge of the sheet, leaves at the opposite edge and never runs through a part: that is the first cut. If there is more than one, which goes first is the subject of the next section.
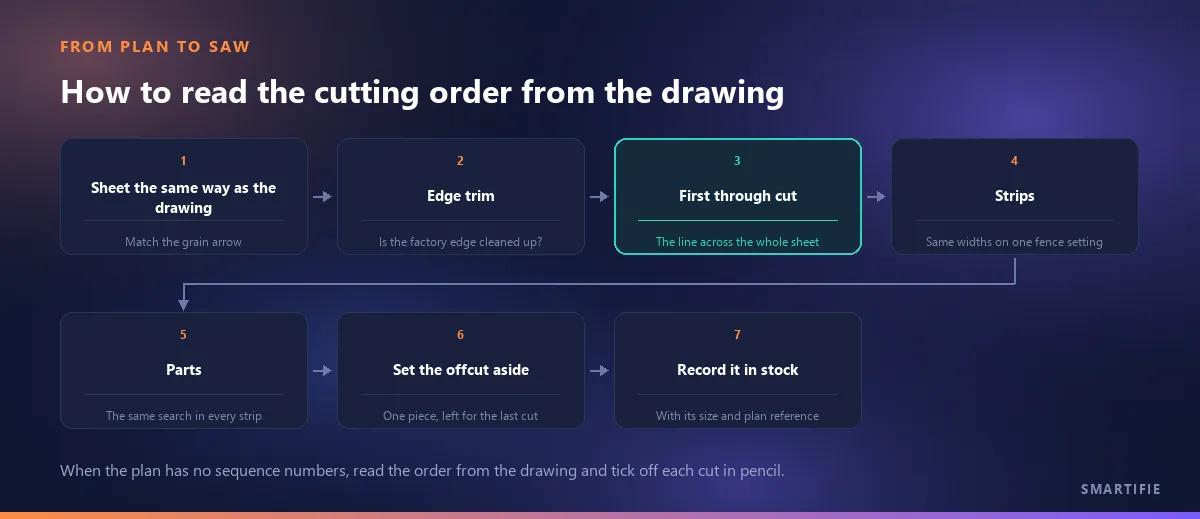
That cut leaves two pieces. Then you repeat the search for each of them: which line crosses this piece from edge to edge? Every cut leaves a new, smaller rectangle, and the search goes on until every part stands on its own. That is the whole method for getting the order out of a plan with no sequence numbers.
If you can't find such a line, the plan isn't a guillotine layout and can't be cut on a panel saw; what a guillotine cut is is explained on the page of our free cutting tool.
Rip or crosscut first? Why woodworkers disagree
When two lines cross the whole sheet, one may be a rip (along the long edge, with the face grain) and the other a crosscut (across it). Which one goes first is an old argument in woodworking shops, and there is no single rule.
A 2009 thread on a practitioners' forum puts the different answers side by side (Festool Owners Group, 2009). Some rip first because the pieces are easier to handle; one finds a 21 × 96 in piece easier to manage than a 48 × 31¾ in one. Another says that sometimes making the crosscut first makes the offcuts more usable later, and adds how hard it is to crosscut a full 4 × 8 sheet on a table saw. A third says the order depends entirely on how the pieces lay out on the sheet.
The guides split the same way. In the example in Kreg's plywood guide, the sheet is first crosscut into smaller sections and the sections are then ripped; the guide also reminds you that on plywood the face grain runs the length of the sheet. Woodsmith suggests grouping parts of the same width and ripping one long strip first. Woodcraft writes that the first move in breaking down a full sheet may be a crosscut, and notes that doing it on a standard table saw is risky.
What they share: the decision comes down to three things.
- The plan: in which direction does a line cross the whole sheet? If only one direction has one, the decision is made.
- The machine: which way can it take a full sheet safely? A panel saw, a sliding table saw and a cabinet saw don't handle the same sheet with the same ease.
- The offcut: which order leaves the leftover area in one piece? We come back to this below.
This article gives you a way to read the plan, not operating instructions: when you decide which machine takes the full sheet and in which direction, follow your machine's manual and your shop's rules.
Strips, columns, parts: counting the stages
Guillotine plans are read stage by stage. In the first stage the sheet is split into strips, in the second the strips into parts or columns, and if needed, in a third stage the columns into parts. In staged cutting, all the cuts of one stage run in the same direction (Wikipedia): if the first stage is rips, the second is crosscuts and the third is rips again.
Counting the stages pays off twice at the saw. First, strips of the same width are cut one after another on a single fence setting; you don't cut one strip, change the setting and come back to the same width later. Second, ticking off each piece on the plan with a pencil as you go shows where every part came from and what comes next; if the cutting stops halfway, where you left off is on the plan.
A plan may not give every sheet the same number of stages: one sheet is done in two stages, another needs four. Read each drawing on its own. Our free cutting tool builds its layouts as strip → column → part; this article is about reading the order from the plan you have. How the tool works is on its own page.
The marks on the plan: look for four things
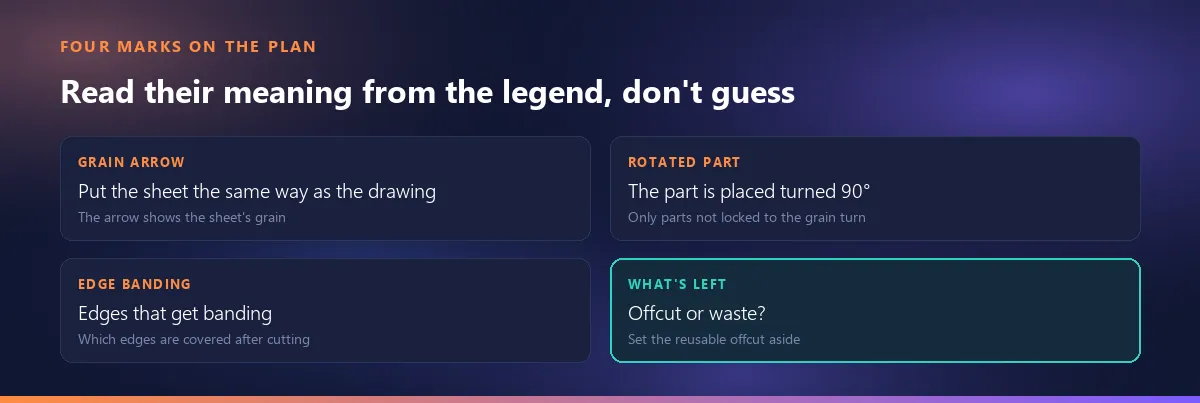
Before the order, read the marks on the drawing. Almost every plan has these four:
- Grain arrow: it tells you to put the sheet on the saw the same way as the drawing. Turn the sheet around and the grain on the grain-locked parts ends up sideways. Which parts must follow the grain is a separate article.
- Rotated part: the part sits turned 90° from its direction on the list. Don't mix up its length and width when you read the size.
- Edge banding: it shows which edges get banding after cutting; it also tells you which edges must come off the saw clean.
- What kind of leftover: once the parts are out, is the remaining area a reusable offcut or waste? Leave an area marked as an offcut for the last cut, and don't split it.
Every program has its own legend; read what a mark means from the legend, don't guess. To give one example, in the drawings of our own cutting planner ⟶ is the grain, ↻ a rotated part, a dark strip the edge banding, a light area a reusable offcut and a hatched area waste or trim. Another program may show the same thing with a different mark.
The order decides the shape of the offcut
When the same plan can be cut in two different orders, the order decides whether the leftover comes out as one large piece or two separate ones. An example: two 30 × 20 in parts, side by side, from a 96 × 48 in sheet (round numbers, kerf ignored).
- Rip first: rip a 20 in strip. What's left is one 96 × 28 in offcut. Two parts come off the strip, leaving 36 × 20 in at its end.
- Crosscut first: cut the sheet at 60 in, then rip a 20 in strip from the 60 × 48 section. What's left is two offcuts, 36 × 48 and 60 × 28 in; the big offcut has been split in two.
The total leftover area is the same both ways; what changes is its shape. Which one helps you depends on which size on your rack will turn into parts later. That is the forum practitioner's point about crosscutting first sometimes making the offcuts more usable: sometimes one direction wins, sometimes the other. Woodsmith suggests taking the big parts first and getting the small ones out of what's left. The rule: leave the offcut for the last cut, and don't make a cut that splits it unless the plan asks for it.
Which offcuts are worth keeping and whether offcuts count as waste are covered in separate articles.
Five checks before you go to the saw
- The sheet's code and size: is this drawing for a full sheet or for an offcut on the rack? If the plan uses offcuts first, the first drawing may be an offcut; take the right piece off the rack.
- Kerf: is the plan's kerf the same as your blade's today? If the blade has changed, every cut shifts the sizes a little and the last part can come up short. Why the kerf matters so much is explained on the tool page.
- Edge trim: does the plan leave room for trimming the factory edge, or will your first cut be the trim cut? Woodsmith reminds you that every saw cut takes material away and that you should leave an allowance for the next step.
- Grain arrow: is the sheet on the saw the same way round as the drawing?
- ×repeat: how many sheets are cut from this drawing? Multiply the parts by the repeat count on the drawing (the “× 4” in the legend, for example) and compare with the list.
One more note: the waste percentage at the top of a drawing belongs to that sheet, not to the job; a small offcut can look high on its own. Why, and whether offcuts count as waste, is in our article on waste percentage.
In a cutting planner: optimize, read the plan, put the offcuts back into stock
If the plan comes from a program, the reading method above stays the same. What changes is how the plan is built and what happens to the offcut after cutting. You can watch it step by step in our own planner in the video below. The materials, sizes and figures in it are fictional example data for a sample shop; the figures are that example's result, not a promise.
Watch how it works
Real screens, start to finish.

Cut List Optimizer: Waste and Offcuts Back to Stock | Smartifie Cut
How to optimize a cutting job in Smartifie Cut and read the cutting plan: the waste figure, what each sheet drawing shows, and how reusable offcuts go back into stock when the plan is sent to cutting.
The video loads from YouTube when you press play.
In Smartifie Cut, a cutting planner that puts the offcuts back into stock, the optimizer takes one material at a time; tick several open jobs in the same material and their parts share the same sheets, in one plan. The offcuts on your rack come ticked together with the full sheets and are filled before a full sheet is opened, so the first drawing may be an offcut. The kerf and “Guillotine cuts only” come from the material and can be changed for that run only. The result is one drawing per sheet, with the repeat count, stock code, size and that sheet's waste at the top. With the default setting that puts offcuts into stock, offcuts big enough to use again are not counted in the waste figure. Nothing is stored until you press “Save plan”, and a saved plan doesn't change. When you choose “Send to cutting”, the stock goes down, the offcut you used leaves the list, the new reusable offcuts appear in stock on their own lines with the plan's reference, and the job is locked.
And one thing the program doesn't do, which we'd rather say plainly: Smartifie Cut does not number the cutting sequence. In guillotine mode the layout is built by splitting the remaining area with one edge-to-edge cut after each part, and the direction of that split, rip or crosscut first, is not a fixed setting. The plan carries neither sequence numbers nor a “first cut” mark; you read the order from the drawing with the method above. A part shows on the drawing by its label, code or name; if those are empty it shows a line number such as “#1”, and that number is the job line, not the cutting order. The details are in the guide's section on the plan screen.
A six-point reading list from plan to saw:
- Find the legend: does the number mean the part or the order?
- Find the line that crosses the whole sheet; that is the first cut.
- Count the stages: strip, column, part; cut the same widths on one setting.
- Leave the offcut for the last cut, and don't split it unless the plan asks.
- Run the five checks: sheet, kerf, edge trim, grain arrow, ×repeat.
- Tick off each cut on the plan in pencil as you go.
In short: read the legend first, then find the line that crosses the whole sheet and repeat the same search in every piece. The plan, the machine and the offcut decide rip or crosscut first together; when both are open, choose the order that leaves the offcut in one piece.
If you want to plan your own jobs and put the offcuts back into stock, you can try Smartifie Cut free for 15 days, no credit card required. It runs as an app on Windows and Android, and in the browser on iPhone and Mac.